Replacing Haier Wi-Fi Modules
—
- ESPHome, ESP, Home Assistant, selfhosted
- 4
- 1
- finished
Although I’m a huge fan of Home Assistant, out of laziness, I’ve been using Haier SmartAir2 application to control 2 Haier air conditioners. This fall we we decided to install 2 additional units in children’s rooms. They were silently hanging on the walls whole winter and spring, and then, when first heats appeared on the horizon, I finally dug out instructions for adding new devices to SmartAir2 application.
Oh, what a surprise! Not only the app kept logging me out randomly, same as before, but it seems that Haier had created alternative app for newer models: hOn. So I was supposed to carry 2 spy apps instead of just 1? No way.
After some digging, I figured that there was a big progress in ESPHome community for Haier ACs since last 2 years. With some courage, replacing Haier wi-fi modules with ESP8266 flashed with Free Software shouldn’t be too hard. And it wasn’t. Here’s what I did.
Built-in Modules
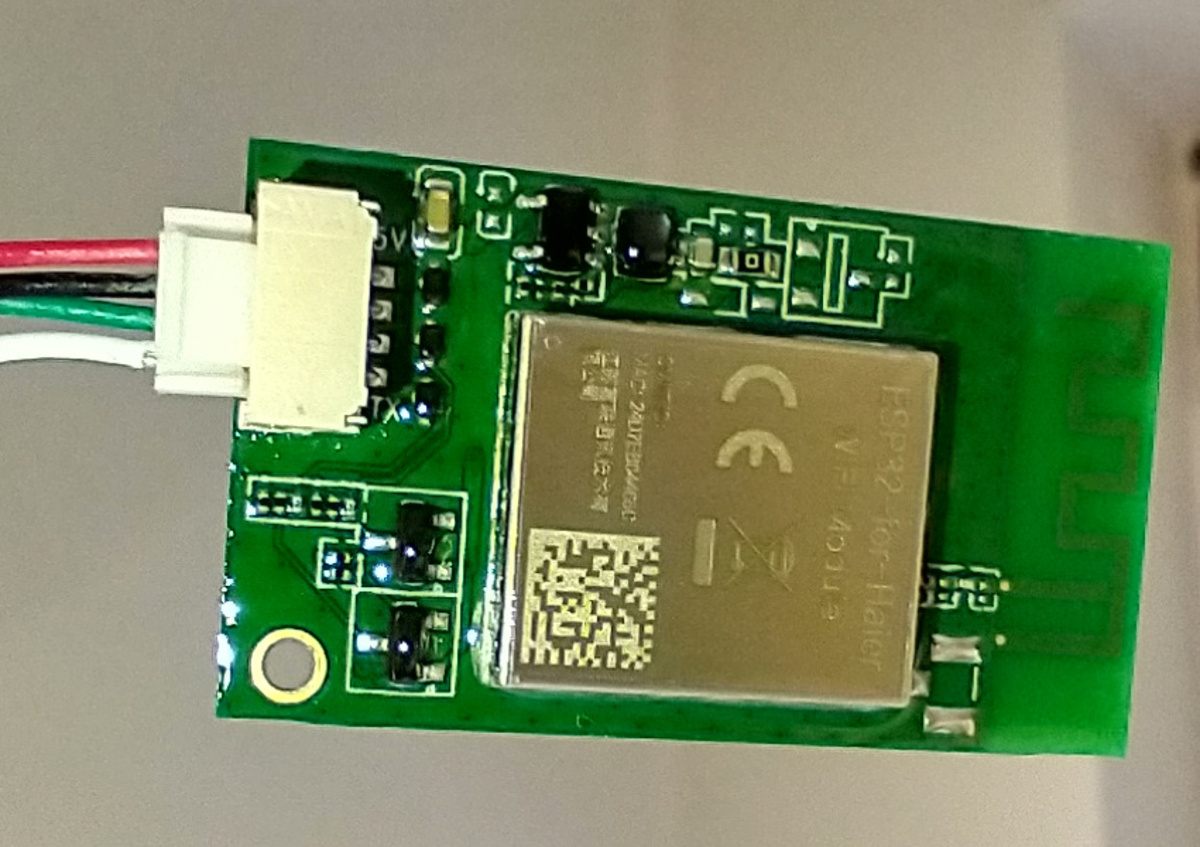
ESP32-for-haier module
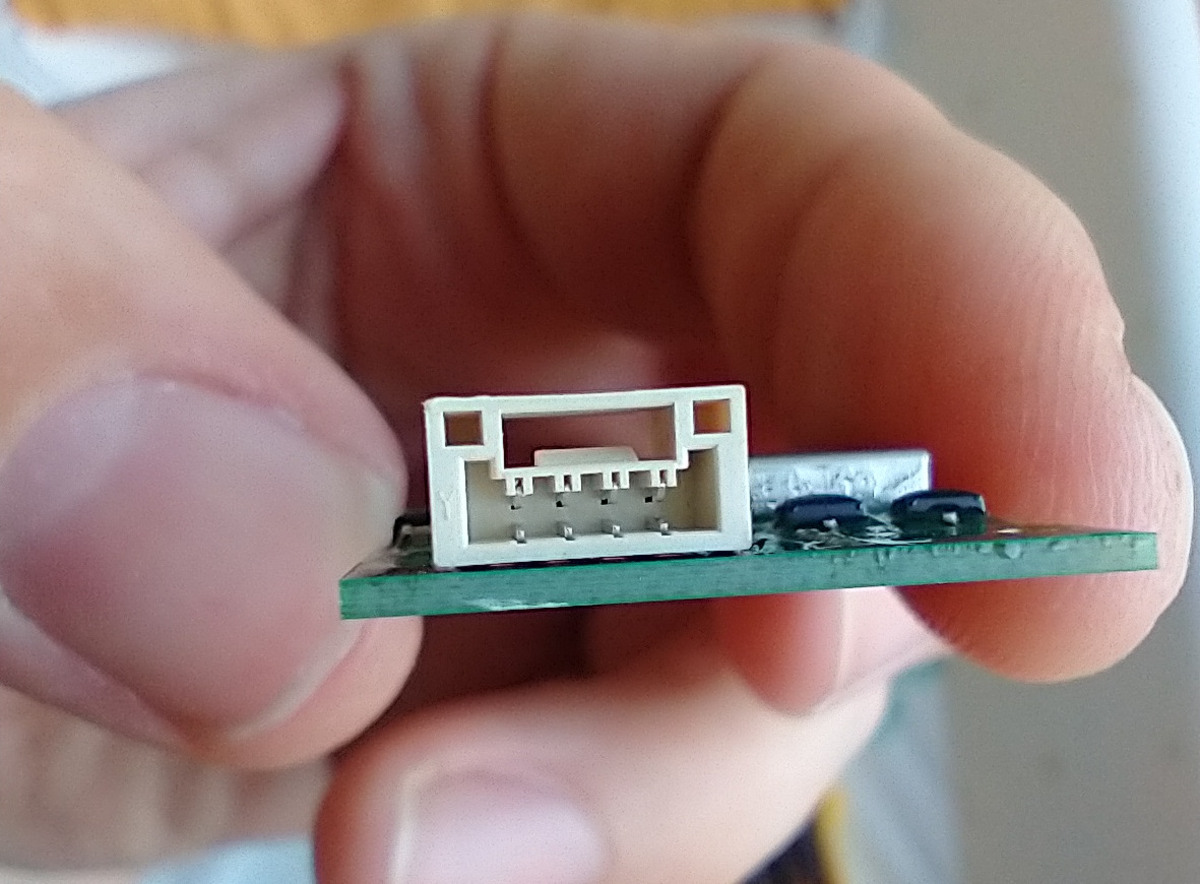
JST GHS connector front
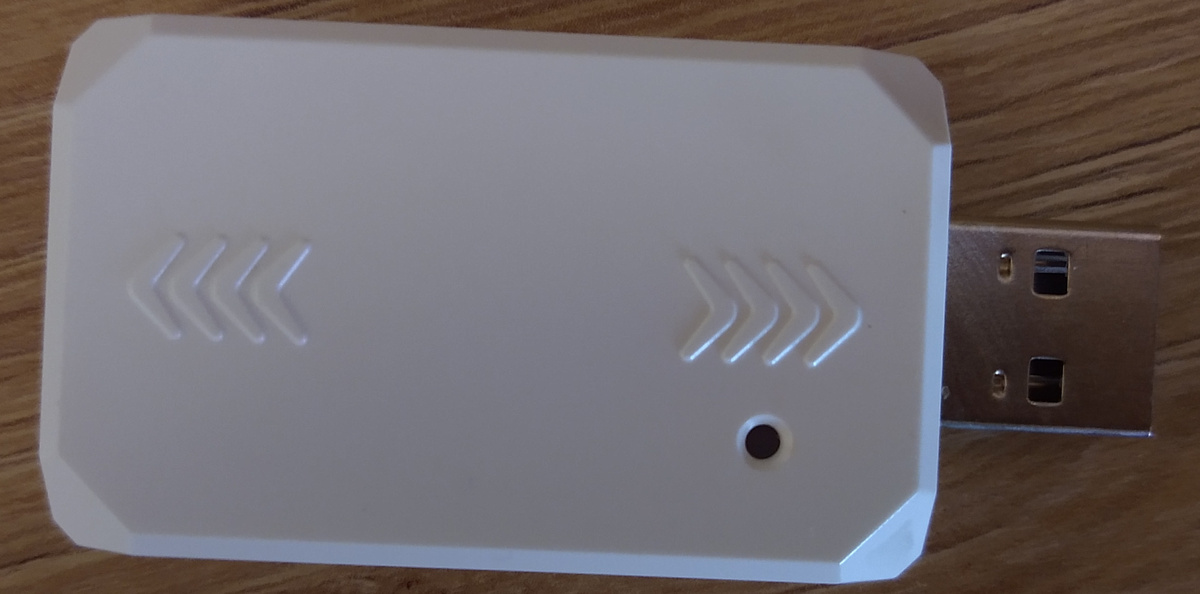
Haier KZW-W002 module
The reason why I was unable to add new AC units to SmartAir2 app is that they speak a different binary protocol which apparently supports more features than the original app. It’s a shitty design choice by Haier to require installing 2 applications if you ask me and it’s what ultimately pushed me to find a different solution.
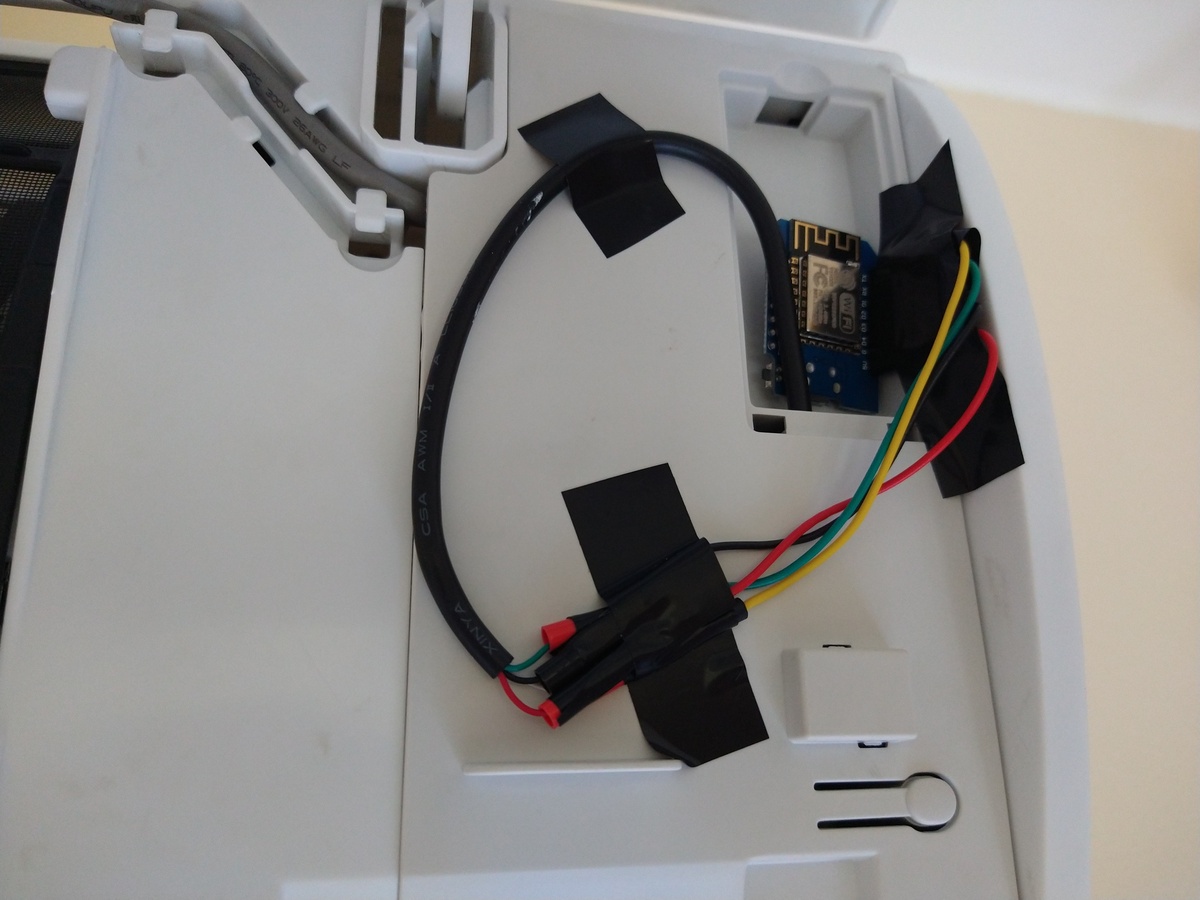
New Haier ACs come with new wi-fi modules called “ESP32-for-Haier”. I’m going to call them “hOn” modules. They connect with mainboard with JST SM04B-GHS-TB connector. They’re fairly hard to find, but I’ve found them in a good price on tme.eu1 and with ordinary shipping price for individual orders (which I think wasn’t always the case for TME). If you’re buying and plan to solder them to wires (which I recommend, because this way you won’t need to cut a cable, thus modify your AC unit), please do yourself a favor and buy more than 1 connector. They have very small pins with 1.25 mm pitch and you will burn them like hell if you don’t have experience and proper equipment.
Older Haiers come with easier to work with USB-like connectors which are known as KZW-W002. These modules don’t speak USB protocol though. It’s UART which uses USB heads for the ease of connection. I wish Haier used USB heads for their new models as well because soldering these takes like 10 minutes and they’re available in basically everywhere.
I’ll call these modules “SmartAir” modules, because originally they work with older SmartAir application.
Physical Connection
Both hOn and SmartAir ACs speak UART to communicate with wi-fi modules. There are 4 cables involved: 5V and GND lines for power and 2 data lines: TX and RX. We must solder these to appropriate pins on our ESP board. Fortunately, data lines aren’t substituted2 and we need to connect TX Haier wire to TX pin on ESP and RX wire to RX pin. What’s more, wires have the same colors for both JST and USB heads.
| Wire Color | Meaning |
|---|---|
| Red | 5V |
| Black | GND |
| Green | RX |
| White | TX |
Bent pinheader soldered to ESP8266
Initially I have soldered a female pinheader row because I wasn’t sure if I’d have to switch TX and RX and I didn’t want to resolder them. Pinheader works but It also adds height to ESP board and it barely fits under the AC lid. I recommend against adding a pinheader if you can avoid it.
2024-07-03: I haven’t tried it yet, but bending the pinheader will probably fix the issue of limited space. Just remember to bend it before soldering and leave some space between it and the board.
JST is very small connector which gave me a lot of trouble. Ultimately only 1 out of 5 connectors I bought survived my experiments. I destroyed the rest in the process.
If you’re soldering these, here’s the tip: you can easily pull these small pins out of the plastic body with pliers, solder them outside and then reinsert. This way you don’t risk burning the body or creating the bridges, but you must be very careful to not add to much solder or otherwise you won’t be able to reinsert the pins.
Alternatively you can cut the lines and connect them without soldering. It doesn’t look very professional, but it gets the job done. I did it for one AC which had one original wire loose (you can see it on the first image of ESP32-for-haier - white TX wire wasn’t soldered in factory at all). You can use small wire terminators to connect 2 wires. Put terminator on one wire, insert the other one from the other side, clench it, isolate and stabilize with an insulating tape or heat shrink tubes. I used insulating tape because I don’t have hot air gun and didn’t want to use a lighter near AC.
There’s a big reserve of UART cable hidden inside the AC, you just need to unscrew the cover and take it out.
New wi-fi module installed but not soldered to the AC's wires
Compared to JST, soldering USB cables is fast and easy. You need to cut any free USB cable, remove the aluminum shield and strip 4 wires, then, then thread them through the holes on your ESP board, and solder to the board. Nothing complicated with that.
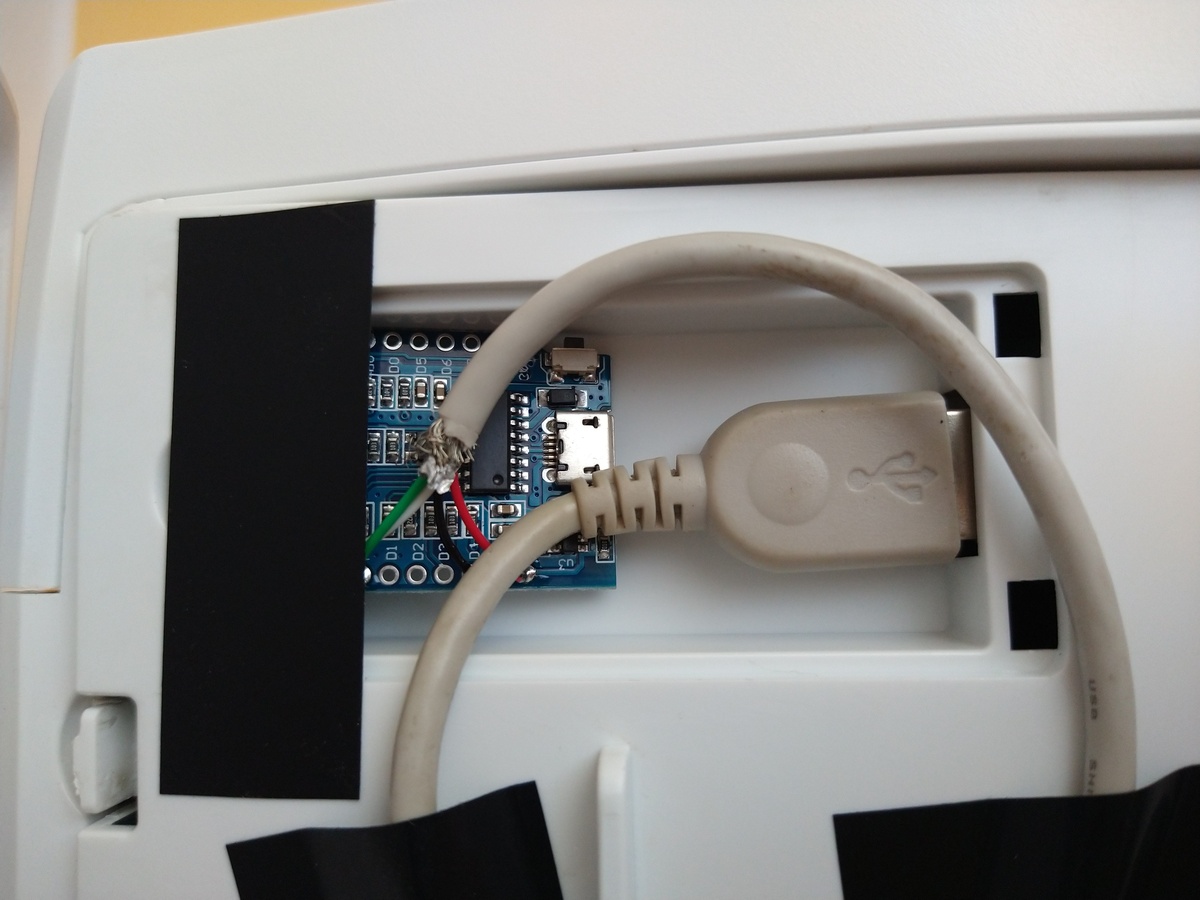
Module installed, version with USB
ESP Home
I have bought Wemos D1 modules which come with a micro USB-to-serial interface which is used for flashing the boards. It’s by far the easiest method of chip flashing I have ever encountered.
There’s a huuuge thread on community.home-assistant.io full of useful knowledge about enabling ESPHome on Haier ACs. It’s active since 2019 and I think I have read most of it. I believe that current state-of-art solution is paveldn/haier-esphome project by Pavlo Dudnytskyi, which supports both SmartAir and hOn protocols. Although its author doesn’t own any Haier SmartAir units, it worked for me out of the box.
There are ESP Home YAML configuration files in haier-esphome repository which only need a slight modification befor the project can be flashed. I needed to change names of my devices and wi-fi credentials.
Using ESP Home is super easy. It is Python package avaiabe on PyPi. To install it I used my favourite pipx command:
$ pipx install esphome
and then to flash the module:
$ esphome run wemos_d1_mini.yaml
After initial flash, you can update your ESP firmware over the air, via
wi-fi. To do so, you need to specify device’s IP address. Firmware has
enabled by default HTTP server through which you can control the device, so
you can verify the IP by connecting to it. Once I had verified that
everything works, I lowered the severity of logging (from DEBUG to INFO) and
did OTA update. Unfortunately, esphome command failed to discover ESP
boards with DNS, and to provide the IP address I had to split compilation and
upload to 2 steps:
$ esphome compile wemos_d1_mini.yaml
$ esphome upload wemos_d1_mini.yaml --device 192.168.1.193
Home Assistant
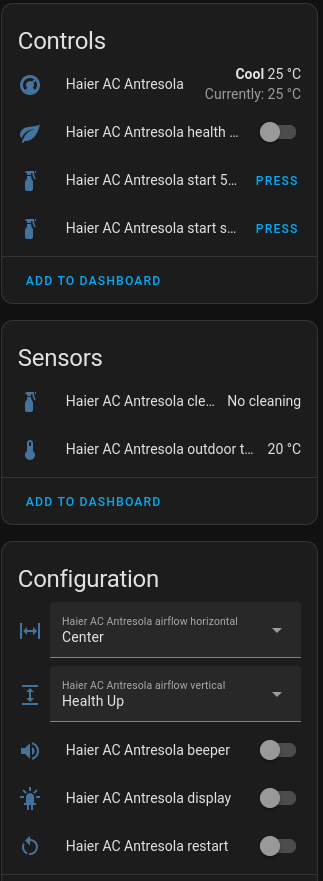
Haier AC controls, sensors and configuration seen in Home Assistant
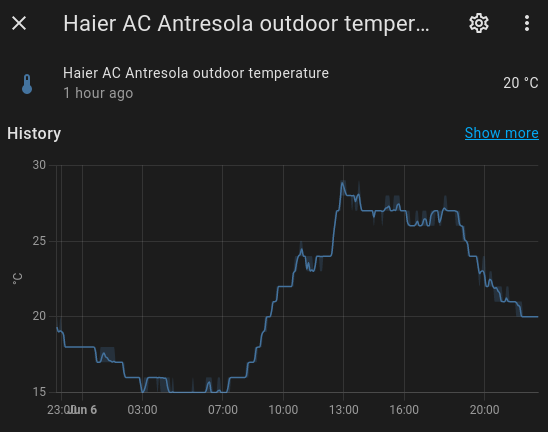
History of outdoor temperature sensor
After connecting ESP8266 to AC unit, it boots and connects to the configured wi-fi. Once connected, it takes ~1 second for Home Assistant to detect new ESPHome devices. 20 times faster than starting any Electron app.
I haven’t written any automations yet, only added ACs as thermostats to dashboards to control them manually. Of course I plan to change that because I’m on the I don’t want to see HA dashboards at all team.
One thing which positively surprised me is that Haier exposes the outdoor temperature (which must be gathered from the outdoor units because it has the same history for 2 indoor units connected to the same outdoor unit). Thanks to this I have 2 new thermometers I can play with.
I’m really happy how everything works. I only worry about the quality of my soldering and if installed modules will stand the test of time. I am also thankful for Haier for developing such shitty applications. If they were only slightly better, I might have no incentive to do this project at all.
In future I’ll consider switching to ESP32-H2 which supports Zigbee, because I’m not a fan of using full-fledged wi-fi for IoT devices. But this is the plan for the next year or two. ESP32-H2s were released very recently so they’re not easily accessible. Generally boards with ESP32 chips are also twice as expensive as ESP8266.
-
TME is one of these online shops which you won’t see on Google, but which you just know after graduating any kind of technological university. ↩
-
Substituting TX and RX is often the case for various telecommunication devices, because ultimately whether the device or port transmits or receives a signal depends on the point of view. Signal exchange always takes place between 2 devices and what’s transmitting signal for one of them is receiving signal for the second one. ↩